By Brad Antoniewicz.
In this blog post I'll aim to get you at least partially familiar with Software Defined Radio, the Realtek RTL2832U chipset, and provide Backtrack 5 R2 setup and usage instructions so that you can easily get off to a good start.
In the last few years, Software Defined Radio (SDR) has been drawing a lot of attention from radio enthusiasts and hackers alike. This is because SDRs move much of the signal processing from hardware into software. This provides incredible flexibility. For instance, normally, with your standard 2.4GHz 802.11 adapter, your use cases are relatively limited: transmitting and monitoring 802.11 traffic on the 2.4GHz spectrum. However with an SDR, since the processing is not locked into the firmware of the adapter, you have greater capabilities: you're only limited by the frequency spectrum the card supports (within 2.4GHz) and not the protocol. So you could then transmit and monitor anything that exists within the 2.4GHz spectrum such as cordless phones, bluetooth devices, microwave ovens, car alarms, video devices, ZigBee (the list goes on and on), and of course, 802.11.
![]()
GNU Radio is the development toolkit that handles the signal processing from the SDR hardware (or a from a file containing signaling information). This is essentially the work horse of SDR. Unfortunately, GNU Radio has a bad reputation for being not so well documented and a bit bloated. That's ok though, whether you agree or not, you cannot deny that it's maintainers are doing really amazing work. In my opinion, if you don't like the documentation, then its up to you to write good guides so that people can utilize this great work.
Obviously a big component of SDR is the hardware. Although there are a number of different platforms out there, we'll discuss the USRP and ones utilizing the RTL2832U chipset (since its the topic of this blog post).
![]()
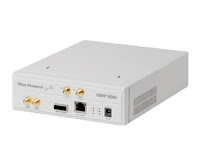
The Universal Software Radio Peripheral (USRP) by Ettus Research (who must be raking in the dough, based on their new website) is, and pretty much has been, the defacto hardware component of SDR for the last 5 years (probably more). The USRP is modular and can support just about any radio frequency spectrum.
The USRP's main problem is that its really expensive. The main component ranges from $650 - $1700, and then you need daughter boards for the specific frequency spectrum you want to play with, which are $74-$450 each. Then there are antennas, cables, and other accessories. Sure, you could always use the open source schematics to build your own, but seriously, who the heck is going to do that. In a community that is known for being creative with costs, the USRP really builds a wall between the classes. Sucks..
![]()
It was recently discovered that a number of manufacturers have released digital TV USB capture devices that leverage the Realtek RTL2832U Chipset. The chipset was created with the intention of doing DVB-T (digital TV) and COFDM (radio) demodulation for these adapters, however a curious radio enthusiast named Antti Palosaari, discovered that:
These $20 adapters are actually SDRs!
As you can imagine, this discovery sparked a whole lot of interest. Soon the Osmocom OsmoSDR team built the necessary software to interact with the chipset and called it RTL-SDR. Additionally, RTL-SDR fans started documenting all of their experiences on the /r/RTLSDR/ subreddit page. People began doing everything they could with their brand new, super cheap, RTL-SDRs
Supported Frequencies
One of the major downsides to the RTL2832U is that it supports only 64 – 1700 MHz (at most). This means we're somewhat confined to the technologies we can play with. That being said, it's really nothing to complain about because there are a ton of things within that frequency spectrum (and for $20, complaining is not allowed)!
Supported Adapters
It's pretty crucial that when choosing what DVB-T dongles you buy, you first consult the various compatibility lists out there to ensure the adapter you're looking at, actually has a RTL2832U chipset and works well. Here are a couple to consult:
Where to buy
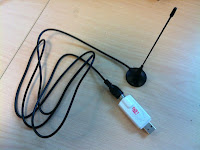
The one shown in the picture is mine, which was actually gifted to me (Thanks Steve!), bought at Deal Extreme (a.k.a. the shadiest site I buy from on the internet). Its the "DVB-T TV Receiver Realtek RTL2832U Elonics E4000 Radio P335", and can also be found on eBay for $18.88 (free shipping).
There's a list of adapters and where to buy them at:
The Windows RTL-SDR setup and configuration is pretty well documented in a variety of places online. I like to use Linux for most of my tinkering, so this guide will focus specifically on setting things up and using Backtrack 5 R2. If you're using MacOSX, you're kind of screwed - RTL-SDR requires GNU Radio >= v3.5.3, and macports doesn't have it pre-built for you, compiling from source is super painful and requires a lot of manual code edits to get things working. Stick with a BT5R2 or Windows Virtual Machine until someone actually gets a macports package out.
Before doing anything, make sure you have the adapter plugged in and its detected by the system.
The people over at hack4fun wrote up an article about how to build everything from scratch. If you'd like to, that's a good guide to get you up and running to a certain point, but the truth is, you don't need to do that much work. There are a couple of scripts and other things that will accomplish the exact same thing (build form source) with much less typing.
Marcus Leech wrote a really simple to use script called build-gnuradio. This works great, but needs a handful of modifications in order to work on Backtrack. The main changes are to remove the sudo checks since Backtrack runs as root. I also added a patch for gr-smartnet to work a little better. An obviously more secure alternative would be to create a non-root user and run the script, but since I always use Backtrack in a non-persistent mode, that isn't a major concern of mine.
My modified version of the build-gnuradio script (called build-gnuradio-bt) can be downloaded here:
The way the script works is that it checks for a packages directory (included in the bundle described in the "The really easy way" section below), and if it doesn't find it, it defaults to the standard build-gnuradio script functionality and downloads all the required sources, compiles them, and installs. During the gnuradio build it will look for a "patches/gnuradio_gri_wav-v0.1.patch" file that patches gnuradio to work with gr-smartnet. If it can't find the patch, it'll just continue on and compile. To run the script, make sure you have internet access and type:
It will take some time to run so be patient. If you're using non-persistent backtrack or don't want to wait a long time for everything to compile, check out the next section, its much faster.
Since I use non-persistent Backtrack a lot and often don't have internet access when I do so, I built everything from scratch then created packages for all of the components.
The downside of this way is that you'll have to download a 290mb file that contains all the packages, but once that's done, its smooth sailing from there.
You can download the bundle (gnuradio_rtl-sdr_bt5r2_bundle_v0.1.tar.bz2) here:
I just copy the bundle to the root of my BT5R2 USB stick, then once its booted, just:
The script will ask you to proceed and you should see output similiar to this:
Then you can rm the directory to free up disk space
Once you have it all installed, a simple test to make sure the adapter is getting recognized is to use the
If you launch mutlimode with no options:
It will listen on 150FM. Make sure you have your speakers turned on and volume up. Remember mutlimode is decoding the over the air signals and playing them back for your enjoyment, no sound = no fun. Obviously if nothing is transmitting in your area on 150MHz then you'll need to change it.
The interface can become a little sluggish and sometimes unresponsive on slower machines, so be patient. It is broken up into three main parts:
![]()
The guys at hack4fun cut out the spectrograph in the version they use on their site, because the panorama was getting cut off by the bottom of the screen.
The local [crappy] radio station here in NYC is Z100, or more specifically 100.3FM. To leverage multimode.py to access it, just launch it with the following attributes:
And you should be able to hear the radio station playing!
Need the weather forecast? Checkout 162.550:
Law enforcement is another great thing to listen to. Since everything is so close together in NYC, you can pick up almost all precincts, so lets see whats going on with the 17th! It's non-trunked and operating at 476.58750 so lets key that into multimode:
And if you keep an eye on the Spectrograph, you can see if there is activity on neighboring frequencies (precincts).
![]()
The GNURadio community is massive and there are a ton of people writing great code to leverage SDR's capabilities. Here's a short list of things that may appeal to our audience:
One of the most powerful components of GNU Radio is the GNU Radio Companion (GRC). It allows you to graphically program GNU Radio applications!
Probably the simplest application to write using GRC is a spectrum analyzer. Since this is just meant as a quick introduction, we'll create a very stripped down spectrum analyzer to demonstrate some of the power of GRC.
The GRC interface is split into three panes:
Since GNU Radio can accept input from a variety of sources, the first thing we'll want to define is the actual source for our application. Since we've been using RTL-SDR, lets pick that.
Under "Sources" select "RTL2832 Source" from the Block pane and drag it into the development area.
Note: According to the comments below, it makes more sense to use the OsmoSDR source, since its the official and latest greatest!
![]()
Next, we'll need to define something to do with our source. Since we want to create a spectrum analyzer, the "FFT sink" block is just what we need as it will show us what the spectrum looks like. We'll use the one under "WX GUI" to leverage wxPython.
Under "WX GUI Widgets" select "WX GUI FFT Sink from the block pane and drag it into the development area.
![]()
We'll have to also connect our Source to the FFT Sink. Click once on "Out" on the Source block then click "In" on the FFT Sink block. This will take the output from our RTL2832 and send it to the FFT sink.
![]()
You'll notice that the title of the source block (RTL2832 Source) and an attribute within the block (Frequency) are both highlighted Red. This indicates a potential error: Frequency is a required attribute and it is undefined. Lets fix that
Double click the source block and set a frequency. Here we'll define that of our radio station (100.3) which in Hz translates to 100300000. The E Notation of that is 1003e5.
![]()
That's all there is to it! Now generate everything by going to "Build" -> "Generate" (or by pressing the generate button). You should be prompted to save first, so here I'll just save it to /root/simple_test.grc:
![]()
Then run it by going to "Build" -> "Execute" (or by pressing the execute button). A new window should open up showing the signal in real time:
![]()
Depending on the power of your system, the window may be a little unresponsive or sluggish. We don't really need a throttle (a block between the source and the FFT sink) but if we add one, it'll fix that a bit.
If you check the "Average" you can clean up the signal:
![]()
The "Peak" checkbox will draw a line on the peaks, which can be useful if the signal is rapidly changing and you're trying to get an idea of what frequencies are being transmitted on:
![]()
If you wanted to always have the "Average" and "Peak" checked, you can modify the FFT Sink in the original drawing and set the two to "On":
![]()
To share your flows with other people, just send them your .grc (/root/simple_test.grc). You'll notice another file was created in the same directory, /root/simple_test.py. This is the Python source file for your application. If you didn't want to run GRC, you can launch the application independently:
Want to learn more? Just yesterday (seriously, GNURadio is freaking exploding because of RTL-SDR), balint256 just put together a group of GNU Radio tutorials that will take you to the next level! Check them out here!
![]()
In this blog post I'll aim to get you at least partially familiar with Software Defined Radio, the Realtek RTL2832U chipset, and provide Backtrack 5 R2 setup and usage instructions so that you can easily get off to a good start.
Software Defined Radio
In the last few years, Software Defined Radio (SDR) has been drawing a lot of attention from radio enthusiasts and hackers alike. This is because SDRs move much of the signal processing from hardware into software. This provides incredible flexibility. For instance, normally, with your standard 2.4GHz 802.11 adapter, your use cases are relatively limited: transmitting and monitoring 802.11 traffic on the 2.4GHz spectrum. However with an SDR, since the processing is not locked into the firmware of the adapter, you have greater capabilities: you're only limited by the frequency spectrum the card supports (within 2.4GHz) and not the protocol. So you could then transmit and monitor anything that exists within the 2.4GHz spectrum such as cordless phones, bluetooth devices, microwave ovens, car alarms, video devices, ZigBee (the list goes on and on), and of course, 802.11.
GNU Radio
GNU Radio is the development toolkit that handles the signal processing from the SDR hardware (or a from a file containing signaling information). This is essentially the work horse of SDR. Unfortunately, GNU Radio has a bad reputation for being not so well documented and a bit bloated. That's ok though, whether you agree or not, you cannot deny that it's maintainers are doing really amazing work. In my opinion, if you don't like the documentation, then its up to you to write good guides so that people can utilize this great work.
Hardware
Obviously a big component of SDR is the hardware. Although there are a number of different platforms out there, we'll discuss the USRP and ones utilizing the RTL2832U chipset (since its the topic of this blog post).
USRP
The Universal Software Radio Peripheral (USRP) by Ettus Research (who must be raking in the dough, based on their new website) is, and pretty much has been, the defacto hardware component of SDR for the last 5 years (probably more). The USRP is modular and can support just about any radio frequency spectrum.
The USRP's main problem is that its really expensive. The main component ranges from $650 - $1700, and then you need daughter boards for the specific frequency spectrum you want to play with, which are $74-$450 each. Then there are antennas, cables, and other accessories. Sure, you could always use the open source schematics to build your own, but seriously, who the heck is going to do that. In a community that is known for being creative with costs, the USRP really builds a wall between the classes. Sucks..
Realtek RTL2832U
It was recently discovered that a number of manufacturers have released digital TV USB capture devices that leverage the Realtek RTL2832U Chipset. The chipset was created with the intention of doing DVB-T (digital TV) and COFDM (radio) demodulation for these adapters, however a curious radio enthusiast named Antti Palosaari, discovered that:
As you can imagine, this discovery sparked a whole lot of interest. Soon the Osmocom OsmoSDR team built the necessary software to interact with the chipset and called it RTL-SDR. Additionally, RTL-SDR fans started documenting all of their experiences on the /r/RTLSDR/ subreddit page. People began doing everything they could with their brand new, super cheap, RTL-SDRs
Supported Frequencies
One of the major downsides to the RTL2832U is that it supports only 64 – 1700 MHz (at most). This means we're somewhat confined to the technologies we can play with. That being said, it's really nothing to complain about because there are a ton of things within that frequency spectrum (and for $20, complaining is not allowed)!
Supported Adapters
It's pretty crucial that when choosing what DVB-T dongles you buy, you first consult the various compatibility lists out there to ensure the adapter you're looking at, actually has a RTL2832U chipset and works well. Here are a couple to consult:
- http://sdr.osmocom.org/trac/wiki/rtl-sdr
- http://www.reddit.com/r/RTLSDR/comments/s6ddo/rtlsdr_compatibility_list_v2_work_in_progress/
- http://www.reddit.com/r/RTLSDR/comments/rbqfz/rtlsdr_compatibility_list_work_in_progress_please/
- http://wiki.spench.net/wiki/RTL2832#Supported_devices
Where to buy
The one shown in the picture is mine, which was actually gifted to me (Thanks Steve!), bought at Deal Extreme (a.k.a. the shadiest site I buy from on the internet). Its the "DVB-T TV Receiver Realtek RTL2832U Elonics E4000 Radio P335", and can also be found on eBay for $18.88 (free shipping).
There's a list of adapters and where to buy them at:
Configuration
The Windows RTL-SDR setup and configuration is pretty well documented in a variety of places online. I like to use Linux for most of my tinkering, so this guide will focus specifically on setting things up and using Backtrack 5 R2. If you're using MacOSX, you're kind of screwed - RTL-SDR requires GNU Radio >= v3.5.3, and macports doesn't have it pre-built for you, compiling from source is super painful and requires a lot of manual code edits to get things working. Stick with a BT5R2 or Windows Virtual Machine until someone actually gets a macports package out.
Making sure your adapter is registered
Before doing anything, make sure you have the adapter plugged in and its detected by the system.
 root@bt:~# lsusb | grep -i RTL
 Bus 001 Device 008: ID 0bda:2832 Realtek Semiconductor Corp. RTL2832U DVB-T
Manual Labor
The people over at hack4fun wrote up an article about how to build everything from scratch. If you'd like to, that's a good guide to get you up and running to a certain point, but the truth is, you don't need to do that much work. There are a couple of scripts and other things that will accomplish the exact same thing (build form source) with much less typing.
The build-gnuradio script
Marcus Leech wrote a really simple to use script called build-gnuradio. This works great, but needs a handful of modifications in order to work on Backtrack. The main changes are to remove the sudo checks since Backtrack runs as root. I also added a patch for gr-smartnet to work a little better. An obviously more secure alternative would be to create a non-root user and run the script, but since I always use Backtrack in a non-persistent mode, that isn't a major concern of mine.
My modified version of the build-gnuradio script (called build-gnuradio-bt) can be downloaded here:
- build-gnuradio-bt: https://raw.github.com/brad-anton/gnuradio/master/build-gnuradio-bt
- gnuradio patch to help gr-smartnet: https://raw.github.com/brad-anton/gnuradio/master/gnuradio_gri_wav-v0.1.patch
The way the script works is that it checks for a packages directory (included in the bundle described in the "The really easy way" section below), and if it doesn't find it, it defaults to the standard build-gnuradio script functionality and downloads all the required sources, compiles them, and installs. During the gnuradio build it will look for a "patches/gnuradio_gri_wav-v0.1.patch" file that patches gnuradio to work with gr-smartnet. If it can't find the patch, it'll just continue on and compile. To run the script, make sure you have internet access and type:
root@bt:~# wget https://raw.github.com/brad-anton/gnuradio/master/build-gnuradio-bt
root@bt:~# mkdir patches
root@bt:~# cd patches
root@bt:~# wget https://raw.github.com/brad-anton/gnuradio/master/gnuradio_gri_wav-v0.1.patch
root@bt:~# cd ..
root@bt:~# chmod +x build_gnuradio_bt
root@bt:~# ./build_gnuradio_bt
It will take some time to run so be patient. If you're using non-persistent backtrack or don't want to wait a long time for everything to compile, check out the next section, its much faster.
The really easy way
Since I use non-persistent Backtrack a lot and often don't have internet access when I do so, I built everything from scratch then created packages for all of the components.
The downside of this way is that you'll have to download a 290mb file that contains all the packages, but once that's done, its smooth sailing from there.
You can download the bundle (gnuradio_rtl-sdr_bt5r2_bundle_v0.1.tar.bz2) here:
- http://www.opensecurityresearch.com/files/gnuradio_rtl-sdr_bt5r2_bundle_v0.1.tar.bz2
- https://docs.google.com/file/d/0B1_75_-JY9jveTg0eGRqNFJtbk0/edit?pli=1 (Added 6/18/2012)
md5sum gnuradio_rtl-sdr_bt5r2_bundle_v0.1.tar.bz2
a603351e08318a963ee850c69acfcbb8 gnuradio_rtl-sdr_bt5r2_bundle_v0.1.tar.bz2

sha1sum gnuradio_rtl-sdr_bt5r2_bundle_v0.1.tar.bz2
66eeb8eaace16f2af73b7d77be3c035fa2359f81 gnuradio_rtl-sdr_bt5r2_bundle_v0.1.tar.bz2
I just copy the bundle to the root of my BT5R2 USB stick, then once its booted, just:
root@bt:~# tar -jxf /cdrom/gnuradio_rtl-sdr_bt5r2_bundle_v0.1.tar.bz2
root@bt:~# cd gnuradio_rtl-sdr_bt5r2_bundle_v0.1/
root@bt:~/gnuradio_rtl-sdr_bt5r2_bundle_v0.1# ./build-gnuradio-bt
The script will ask you to proceed and you should see output similiar to this:
[+] Offline install -> Installing gnuradio + supporting libraries
[+] Removing potentially conflicting packages
[+] Installing precompiled binaries from /root/gnuradio_rtl-sdr_bt5r2_bundle_v0.1/packages
[+] Wrapping up install
[+] Copying util to ~/rtl_sdr-utils
[+] Offline installation Completed! Enjoy!
Then you can rm the directory to free up disk space
root@bt:~/gnuradio_rtl-sdr_bt5r2_bundle_v0.1# cd ..
root@bt:~# rm -rf gnuradio_rtl-sdr_bt5r2_bundle_v0.1/
Using RTL-SDR
Once you have it all installed, a simple test to make sure the adapter is getting recognized is to use the
rtl_test utility to run a quick benchmark. Your output should be similar:root@bt:~# rtl_test -t
Found 1 device(s):
0: Generic RTL2832U (e.g. hama nano)
Using device 0: Generic RTL2832U (e.g. hama nano)
Found Elonics E4000 tuner
Supported gain values (18): -1.0 1.5 4.0 6.5 9.0 11.5 14.0 16.5 19.0 21.5 24.0 29.0 34.0 42.0 43.0 45.0 47.0 49.0
Benchmarking E4000 PLL...
[E4K] PLL not locked for 51000000 Hz!
[E4K] PLL not locked for 2219000000 Hz!
[E4K] PLL not locked for 1109000000 Hz!
[E4K] PLL not locked for 1237000000 Hz!
E4K range: 52 to 2218 MHz
E4K L-band gap: 1109 to 1237 MHz
root@bt:~#
Multimode.py
Marcus Leech created a tool called Multimode that acts as a multi-mode receiver for a variety of modes such as FM, AM, SSB, WFM, and TV-FM. This is the perfect tool to start playing with SDR.Installation
If you used the easy way above, then multimode is already installed, if not, you'll need to do it.root@bt:~# svn co https://www.cgran.org/svn/projects/multimode
A multimode/trunk
A multimode/trunk/multimode_helper.py
A multimode/trunk/multimode.py
A multimode/trunk/COPYING
A multimode/trunk/multimode.grc
A multimode/trunk/Makefile
A multimode/trunk/README
Checked out revision 996.
root@bt:~# cd multimode/trunk/
root@bt:~/multimode/trunk# make install
mkdir -p /root/bin
cp multimode.py multimode_helper.py /root/bin
Please make sure your PYTHONPATH includes /root/bin
And also that PATH includes /root/bin
this will allow multimode to work correctly
root@bt:~/multimode/trunk# export PYTHONPATH=$PYTHONPATH:/root/bin
root@bt:~/multimode/trunk# export PATH=$PATH:/root/bin
Interface
If you launch mutlimode with no options:
root@bt:~/bin# ./multimode.py
It will listen on 150FM. Make sure you have your speakers turned on and volume up. Remember mutlimode is decoding the over the air signals and playing them back for your enjoyment, no sound = no fun. Obviously if nothing is transmitting in your area on 150MHz then you'll need to change it.
The interface can become a little sluggish and sometimes unresponsive on slower machines, so be patient. It is broken up into three main parts:
- Controls (Top)
- Spectrograph (Middle)
- Panorama (Bottom)
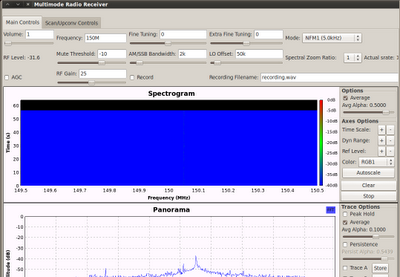
The guys at hack4fun cut out the spectrograph in the version they use on their site, because the panorama was getting cut off by the bottom of the screen.
Listening to FM Radio!
The local [crappy] radio station here in NYC is Z100, or more specifically 100.3FM. To leverage multimode.py to access it, just launch it with the following attributes:
root@bt:~/bin# ./multimode.py --freq 100.3M --dmode=WFM
And you should be able to hear the radio station playing!
Need the weather forecast? Checkout 162.550:
root@bt:~/bin# ./multimode.py --freq 162.550M
Listening to Local Law Enforcement!
Law enforcement is another great thing to listen to. Since everything is so close together in NYC, you can pick up almost all precincts, so lets see whats going on with the 17th! It's non-trunked and operating at 476.58750 so lets key that into multimode:
root@bt:~/bin# ./multimode.py --freq 476.587M --ftune=5k
And if you keep an eye on the Spectrograph, you can see if there is activity on neighboring frequencies (precincts).

Other Notable Fun!
The GNURadio community is massive and there are a ton of people writing great code to leverage SDR's capabilities. Here's a short list of things that may appeal to our audience:
- GSM Sniffer! - Airprobe
- Trunked Radio! - gr-smartnet (More updated info here: https://github.com/bistromath/gr-smartnet). There has been a lot of activity on this front, be sure to check this reddit for the latest!
Using the GNU Radio Companion
One of the most powerful components of GNU Radio is the GNU Radio Companion (GRC). It allows you to graphically program GNU Radio applications!
Creating a Spectrum Analyzer
Probably the simplest application to write using GRC is a spectrum analyzer. Since this is just meant as a quick introduction, we'll create a very stripped down spectrum analyzer to demonstrate some of the power of GRC.
Launching GRC
Launching GRC will require you to be running X, then just run:root@bt:~# gnuradio-companion
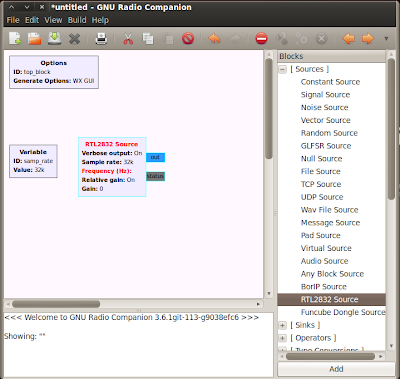
The GRC interface is split into three panes:
- The development area (Main Area/Left pane): This is where you'll create your flow graph
- Logging pane (Lower): Provides logging and debugging messages
- Block (Right pane): Lists the different development blocks that will make up your flow graph and application
Creating a Signal Flow Graph
Since GNU Radio can accept input from a variety of sources, the first thing we'll want to define is the actual source for our application. Since we've been using RTL-SDR, lets pick that.
Under "Sources" select "RTL2832 Source" from the Block pane and drag it into the development area.
Note: According to the comments below, it makes more sense to use the OsmoSDR source, since its the official and latest greatest!
Next, we'll need to define something to do with our source. Since we want to create a spectrum analyzer, the "FFT sink" block is just what we need as it will show us what the spectrum looks like. We'll use the one under "WX GUI" to leverage wxPython.
Under "WX GUI Widgets" select "WX GUI FFT Sink from the block pane and drag it into the development area.
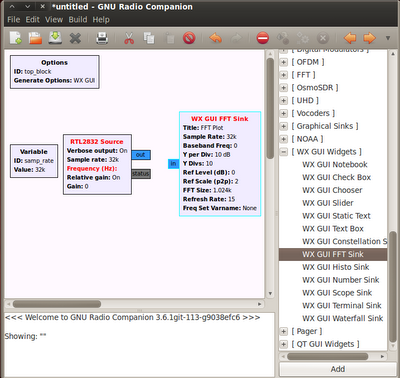
We'll have to also connect our Source to the FFT Sink. Click once on "Out" on the Source block then click "In" on the FFT Sink block. This will take the output from our RTL2832 and send it to the FFT sink.

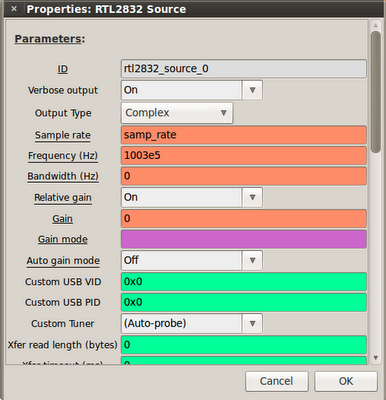
You'll notice that the title of the source block (RTL2832 Source) and an attribute within the block (Frequency) are both highlighted Red. This indicates a potential error: Frequency is a required attribute and it is undefined. Lets fix that
Double click the source block and set a frequency. Here we'll define that of our radio station (100.3) which in Hz translates to 100300000. The E Notation of that is 1003e5.
That's all there is to it! Now generate everything by going to "Build" -> "Generate" (or by pressing the generate button). You should be prompted to save first, so here I'll just save it to /root/simple_test.grc:

Then run it by going to "Build" -> "Execute" (or by pressing the execute button). A new window should open up showing the signal in real time:
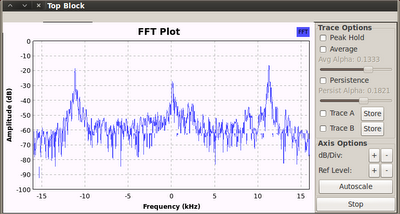
Depending on the power of your system, the window may be a little unresponsive or sluggish. We don't really need a throttle (a block between the source and the FFT sink) but if we add one, it'll fix that a bit.
If you check the "Average" you can clean up the signal:

The "Peak" checkbox will draw a line on the peaks, which can be useful if the signal is rapidly changing and you're trying to get an idea of what frequencies are being transmitted on:
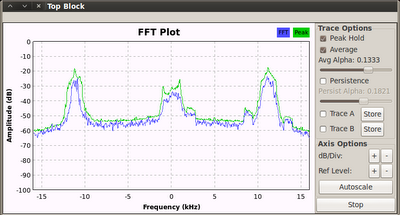
If you wanted to always have the "Average" and "Peak" checked, you can modify the FFT Sink in the original drawing and set the two to "On":

To share your flows with other people, just send them your .grc (/root/simple_test.grc). You'll notice another file was created in the same directory, /root/simple_test.py. This is the Python source file for your application. If you didn't want to run GRC, you can launch the application independently:
root@bt:~ # ./simple_test.py
Want to learn more? Just yesterday (seriously, GNURadio is freaking exploding because of RTL-SDR), balint256 just put together a group of GNU Radio tutorials that will take you to the next level! Check them out here!
Got tips for GNU Radio or RTL-SDR? See something I got wrong above? Speak up in the comments below!!
